Table of Contents
To illustrate the capabilities of MobilityDB, we give an example use case that loads, explores, and query mobility data. The data used is based on the MobilityDB implementation of the BerlinMOD benchmark for moving object databases. The data is available as a ZIP file.
For this tutorial we can use two alternative installations:
Install from sources
Use a Docker image containing MobilityDB and all its dependencies (including PostgreSQL and PostGIS)
We explain first the installation from sources and later in this section we explain the installation using a Docker image.
In order to use this tutorial you must first have MobilityDB installed in your system. We refer to the MobilityDB documentation for doing this task. Then we can install the MobilityDB-BerlinMOD tutorial as follows.
git clone https://github.com/MobilityDB/MobilityDB-BerlinMOD.git
cd MobilityDB-BerlinMOD/BerlinMOD
We explain now how to explore this tutorial using a Docker image that contains MobilityDB and all its dependencies (including PostgreSQL and PostGIS). The container has a default database called mobilitydb with the MobilityDB extension installed where user = pw = docker. This presupposes that you have installed Docker into your computer. In that case, you can run the following command.
docker pull mobilitydb/mobilitydb
docker volume create mobilitydb_data
docker run --name "mobilitydb" -d -p 25432:5432 -v mobilitydb_data:/var/lib/postgresql
mobilitydb/mobilitydb
In the above commands
docker pulldownloads the Docker image ofmobilitydb. If the image has been downloaded before, this checks whether a more recent image has been published in the docker repository, and downloads it. It is better to call this command every time, to ensure that you have the most up-to-date version of this image.docker volume create mobilitydb_datacreates a volume container on the host, that we will use to persist the PostgreSQL database files outside of the MobilityDB container. You need to run this command only once, during the first use of the imagedocker run --name=mobilitydbtells Docker our new container will be namedmobilitydb.-druns the container in the background (detached mode).-p 25432:5432maps TCP port 5432 in the container to port 25432 on the Docker host (to prevent potential conflicts with any local database instance you may have). This is required because the PostgreSQL database server in the container listens for connections on port 5432 by default.-v mobilitydb_data:/var/lib/postgresqltells the container filesystem to mount themobilitydb_datavolume that we have just created to the path/var/lib/postgresql. This means that any database objects that the container saves or creates (by default in/var/lib/postgresql) will instead be persisted in themobilitydb_datadirectory, which is stored in the host. This options ensures that your data will not be lost when the container is removed.mobilitydb/mobilitydbtells Docker to pull the docker image with that name from Docker Hub.
Now we can launch any PostgreSQL administrative front-end to start using MobilityDB. Two traditional ones are the command-line tool psql and the graphical tool pgAdmin. We can launch psql as follows.
docker exec -t -i mobilitydb psql -h localhost -p 5432 -d mobilitydb -U docker
In the above command
docker exec -t -i mobilitydb psqltells Docker to allocate a pseudo-TTY, to keep STDIN open, and to execute in the containermobilitydbthe commandpsql.-h localhost -p 5432 -d mobilitydb -U dockertellspsql, respectively, the database server host, the server port, the database name, and the user name.
Note that you will be prompted to provide the password, which is also docker.
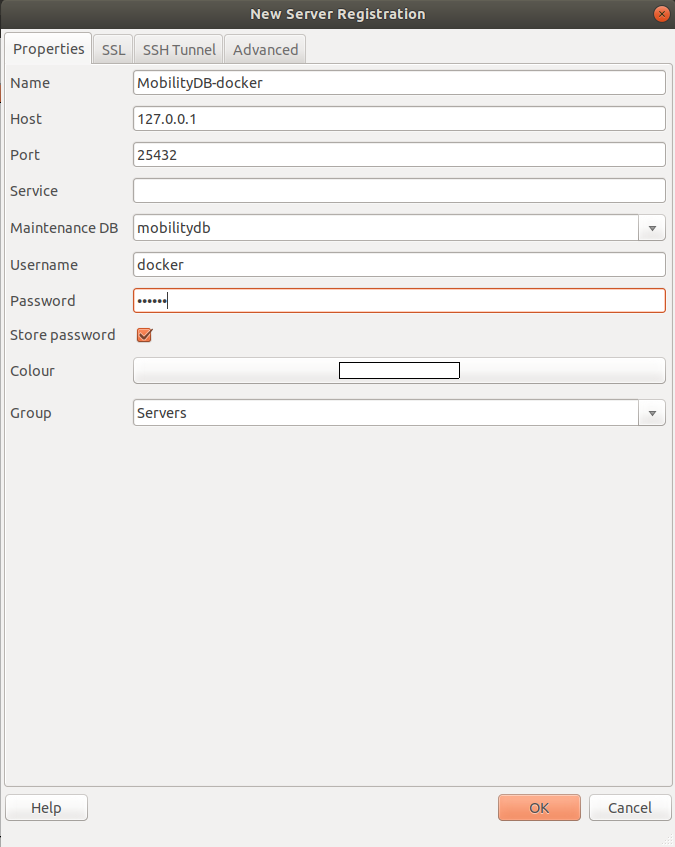
In order to launch pgAdmin, there are two options to create a connection. The first option is to set the host to the localhost (127.0.0.1), and the port to the mapped one on the host, as per the docker run command. In this example the port is 25432. Now we can launch pgAdmin and establish a new connection to the docker container. This is done as shown in Figure 1.1, “Configuration of a connection to the docker image in pgAdmin.”.
The second option is to know the IP address used by docker container with the following command.
docker-machine ip
-- 192.168.99.101
Notice that the address obtained in your computer may be different from the one above. Now we can launch pgAdmin and establish a new connection to the docker container. This is done as shown in Figure 1.1, “Configuration of a connection to the docker image in pgAdmin.”. The second option is to set the host to the localhost (127.0.0.1), and the port to the mapped one on the host, as per the docker run command. In this example the port would be 25432.
Now you can use pgAdmin to query the mobilitydb database, as will be further explained in the following sections. Here are few more docker commands that you will eventually need:
docker stop "mobilitydb"
docker start "mobilitydb"
docker rm "mobilitydb"
The above commands
docker stopshuts down the docker container. You need to issue this command, for example, if you need to re-start the host.docker startlaunches back the docker container. You need to issue this command, for example, after re-starting the host.docker rmremoves/deletes docker container. You need to issue this command, for example, if you need todocker pulla more recent MobilityDB image. If the databases are stored in adocker volumeas explained above, it will still be available after downloading and running the new image.